Creating a NodeJS Development Environment With Docker
For my next Pluralsight course, I need an API to demonstrate some of the concepts. I want to give my viewers the ability to run the same API. I could have done this by creating an API and publishing it to Heroku. However, I was concerned about the possibility of opening up a CRUD API to the world, both in terms of potential content and in terms of cost. Additionally, I wanted my viewers to see the exact same thing when running commands as what’s on the video, and a public API might have data that changes over time. As a result, I decided I would create an API and place it in a github repo. (Note: this repo will likely experience changes up until the course is released.) That way they could run the exact same code I had.
In previous courses, I’ve had problems where versions of packages got out of date and I didn’t really want to deal with that. That’s when I had the idea to use Docker containers. This should give me the ability for them to pull down a container and run it with reduced concern that there were new changes from the time I released the course until I ran it.
Basic Setup
I started by creating an Express application. I also installed some basic libraries such as mocha for testing and sequelize for data access. Once I had that, I was ready to start figuring out how I could use docker. I knew I was going to use a postgres database and so I would need to have more than just a single docker file. I was going to need to use Docker Compose. From the docker compose docs
Compose is a tool for defining and running multi-container Docker applications.
Basically it meant I could have a postgres container and a separate node server container and they would play together nicely.
Dockerfile
I started by creating a Dockerfile for my main application, and placed it in the root of the folder.
FROM node:8.4.0

# Set /app as workdir
RUN mkdir /app
ADD . /app
WORKDIR /app

COPY package.json .
COPY package-lock.json .

RUN npm install --quiet

COPY . .
The first line tells Docker that this is going to use NodeJS version 8.4. It pulls the official node image to use.
The next 3 lines set up the folder structure inside the container. That is, my container was going to have a working directory named /app.
Then, I instruct Docker to copy over package.json and package-lock.json. This allows me to run npm install (the next line) and have all of the packages I need installed into the container. The package-lock.json file makes sure that npm uses the exact version of files that I’m using locally. This will hopefully help reduce the issue of a viewer getting an updated version that changed some behavior that I depend on.
After running npm install thenI copy over the rest of my project. My routes, and controllers and models etc.
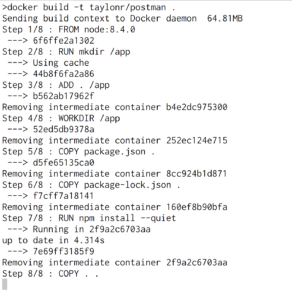
After I had that, I was able to run the following command to build my docker image
docker build -t taylonr/postman .
The -t taylonr/postman specifies the tag of the image that is being built.
The . indicates that it is to build the current folder.
The output of the command looks like this:
After that completed I knew I had an image that would run my application. But I didn’t yet have a postgres database, additionally, I didn’t want to have to make people install a postgres database just so they could use my API. I’m trying to keep the barrier to entry to be fairly low. If I can get them to clone a repo and install docker, then they should be good to go.
Docker Compose
As was mentioned earlier, I needed to use docker compose, and now that I had a build it was time to start exploring that.
I started by creating a file docker-compose.yml in the root of my project (next to the Dockerfile) that I created earlier.
version: '2'
services:
  db:
    image: postgres
    ports:
      - "5432:5432"
    environment:
      POSTGRES_USER: postgres
      POSTGRES_DB: postman_dev
The version there is the dockerfile version. This tells docker what types of properties are available.
Then there’s a services item and underneath that. Here, I specified a new service named db. I could have used whatever name I wanted, such as psql or database etc.
Underneath that, it instructs docker to use the official postgres image.
Then I had to tell it that I wanted to expose ports. The default port that postgres runs on is 5432 so I exposed that as the port that my application would connect to.
Then I specified some environment variables, POSTGRES_USER and POSTGRES_DB. These would be the environment variables that I would set in bash had I installed postgres locally. This time, though, they’re environment variables not on my machine, but in the postgres container.
After defining the db service, I needed to specify my web application.
web:
  build: .
  command: npm run start:dev
  image: taylonr/postman
  ports:
    - "3000:3000"
  volumes:
    - .:/app
  depends_on:
    - db
  environment:
    DATABASE_URL: postgres://postgres@db
Again, web here was the name I chose, it could have been api or some other name.
Jumping out of order for a second, there is a command on line 10: depends_on. This tells docker that before it can do anything with the web service, it needs to make sure the db service is up and running.
Going back through the rest of the arguments:
build the location of the docker file.
command this is the command that is run for this image. In this case, it’s calling the npm task start:dev (defined in my package.json file)
image because this is specified with the build parameter, it will name the image taylonr/postman
ports again maps the ports available, this will expose the app so I can hit it at localhost:3000
volumes allows it so that the container will use my local source files. Without this specifying, I would need to rebuild the container after every code change. By specifying this, I am able to have it run nodemon so that it can watch for changes and rebuild.
environment again specifying the environment variables that are needed for this container. You can see the @db in the connection string to indicate that it’s using the db service.
Running the Container
After creating that file, the only thing left to do was to run it.
docker-compose up
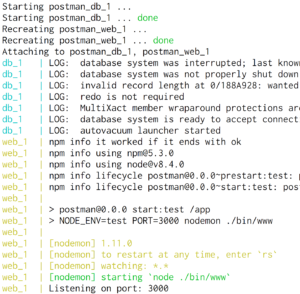
This tells docker to spin up the containers specified in docker-compose.yml. It will go through the process of spinning up the postgres container and then spinning up the web application container. All of this will be spit out on your terminal
The output here looks very similar to what you’d see if you were running postgres and node locally on your machine.
For development purposes, I like seeing this output because it can show me any errors I encounter while developing. If I didn’t want to see the output, I could tell docker to run in a detached mode.
docker-compose up -d
This would launch the container and then return me back to the prompt. I could then tear down the containers using
docker-compose down
Data
This allowed me to work on my API and tear it down at will. Since I didn’t specify a volume for my db service, every time I tear down and restart the container, I have a brand new database. For what I’m doing, it’s actually desired behavior. But I needed a way to migrate and seed a database. That is, I needed a way to create my tables and then load them with some data. This will again ensure that my viewers have the same data to start with.
Sequelize, the ORM I was using has the capability to perform a migration and/or seeding of a database. These are npm tasks that I specified in my package.json file
"db:migrate": "./node_modules/.bin/sequelize db:migrate",
"db:seed": "./node_modules/.bin/sequelize db:seed:all"
The problem, though, is that I’m running in a container so I need some way to tell the container to run these functions.
Luckily, docker provides a way to interact with individual containers. Running the command
docker ps
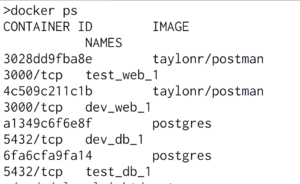
Will spit out the following data.
This shows the 2 containers that are running (web and database) as well as the hash that they can be identified. With these hashes we can access the containers and run commands inside of them.
docker exec -it $(docker ps | grep postman_web | awk '{ print $1 }') /bin/sh -c 'npm run db:migrate'
This shell command might be a little scary at first, so let’s walk through it.
docker exec is the command used to execute a command in a container. A typical usage would be docker exec <hash> <command>
-it are flags to indicate that this command should be interactive and to allow for psuedo TTY
Next, $(docker ps | grep postman_web | awk ‘{ print $1 }’) is a bash way of getting the hash needed to identify the container. It runs docker ps and searches for postman_db to find the correct item, then it fetches the hash.
/bin/sh -c is the command we want docker exec to run.
‘npm run db:migrate’ is the command that we want to run in the shell.
Once this runs, it winds up doing the same thing as
docker exec -it d87d55557104 /bin/sh -c 'npm run db:migrate'
Which is the way to tell the web container to run npm run db:migrate, which will connect to the database and create tables and fields.
The problem is, that’s a lot to type out, and really, to have a good flow, it’s probably best to drop the database, create a database, migrate and then seed the database. So you’d have 4 commands like this.
As a result, I created a database.sh
docker exec -it $(docker ps | grep dev_db | awk '{ print $1 }') /bin/sh -c 'dropdb -U postgres postman_dev'
docker exec -it $(docker ps | grep dev_db | awk '{ print $1 }') /bin/sh -c 'createdb -U postgres postman_dev'
docker exec -it $(docker ps | grep dev_web | awk '{ print $1 }') /bin/sh -c 'npm run db:migrate'
docker exec -it $(docker ps | grep dev_web | awk '{ print $1 }') /bin/sh -c 'npm run db:seed'
Now I can have my users recreate their database by simply running a shell script.
Environments
For part of my course, I wanted to be able to hit 2 separate environments, a dev and test environment. I already had a docker container that I knew did what I wanted, I just wanted to be able to run it on two separate ports (e.g. 3000 and 3030.) As I looked around, I found that it is possible to use environment variables inside of a docker-compose file.
For example, the command below will tell docker that it’s the test environment and that it should run the database on port 5433 and it should run the application on port 3030.
ENV=test DB_PORT=5433 WEB_PORT=3030 docker-compose up
But the docker-compose file that I wrote above doesn’t know how to use those environmental variables at all. In order to tell it to use environmental variables, I used the syntax ${VAR_NAME}
version: '2'
services:
  db:
    image: postgres
    ports:
      - "${DB_PORT}:5432"
    environment:
      POSTGRES_USER: postgres
      POSTGRES_DB: postman_dev
  web:
    build: .
    command: npm run start:${ENV}
    image: taylonr/postman
    ports:
      - "${WEB_PORT}:3000"
    volumes:
      - .:/app
    depends_on:
      - db
    environment:
      DATABASE_URL: postgres://postgres@db
You can see that compose file will use the DB Port (line 6), Environment (line 12) and Web Port (line 15).
The problem is, if I try to run this same command with 2 different sets of environment variables docker will take the 2nd command and overwrite the first command.
Here, the DB port was set to 5433 and then 5432, but when docker ps was run, there is only one container running, and it’s at port 5432.
But docker compose allows for a -p flag which designates the project name. By default, the directory name is used, but by specifying a unique project, we can run two copies.
ENV=dev DB_PORT=5432 WEB_PORT=3000 docker-compose -p dev up -d
ENV=test DB_PORT=5433 WEB_PORT=3030 docker-compose -p test up -d
Here by specifying -p dev and then -p test it creates two separate containers
Here you can see there are now two copies of taylonr/postman and two copies of postgres that are running. Notice that the names are now prepended with the project name. That is there is a test_web_1 and a dev_web_1.
Again, that’s kind of messy and I wouldn’t want my viewers to have to type all of that out. So I created two more shell scripts: dev.sh and test.sh
#!/bin/bash
ENV=dev DB_PORT=5434 WEB_PORT=3000 docker-compose -p dev up
This makes it so the viewers can spin up the entire dev environment with one single command
sh dev.sh
Wrap Up
My goal for this entire exercise was to be able to make it as easy as possible for viewers of my course to get up and running with the same version of the project and data that I will be using to create the course. I understand that not everyone will be familiar with NodeJS so I don’t want to make everyone pull and build a node project. In part, because it would require them to install NodeJS on their system if they didn’t already have it (not to mention postgres.) Docker alleviates some of that. But it also requires that someone is somewhat familiar with various docker commands, and if you forget one flag you’ll get an obscure error message. I didn’t want to need to spend time supporting various typos on the command line.
As a result, with a combination of node, docker and basic shell scripting, I was able to create a series of commands to spin up a new environment, or re-seed a database. To me, the best part is a separate script that I created named init.sh
#!/bin/bash
echo "BUILDING DOCKER IMAGE"
docker build -t taylonr/postman .
echo "LAUNCHING DOCKER CONTAINER"
sh ./dev.sh
sh ./database.sh
If someone has docker installed and has pulled my repo, they can simply run
sh init.sh
And then point their browser to localhost:3000/books and they’ll be able to see the initial seed data that’s in the postgres database.


